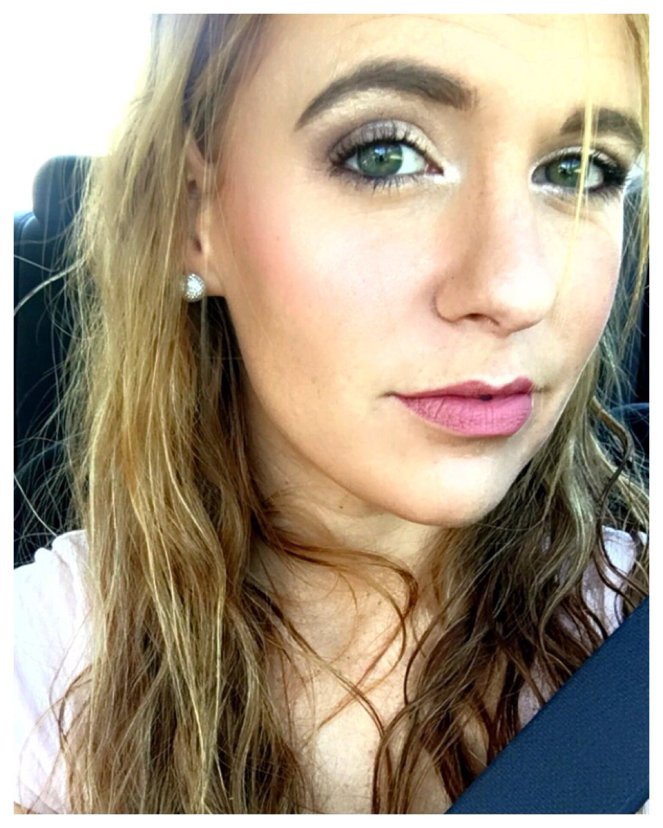
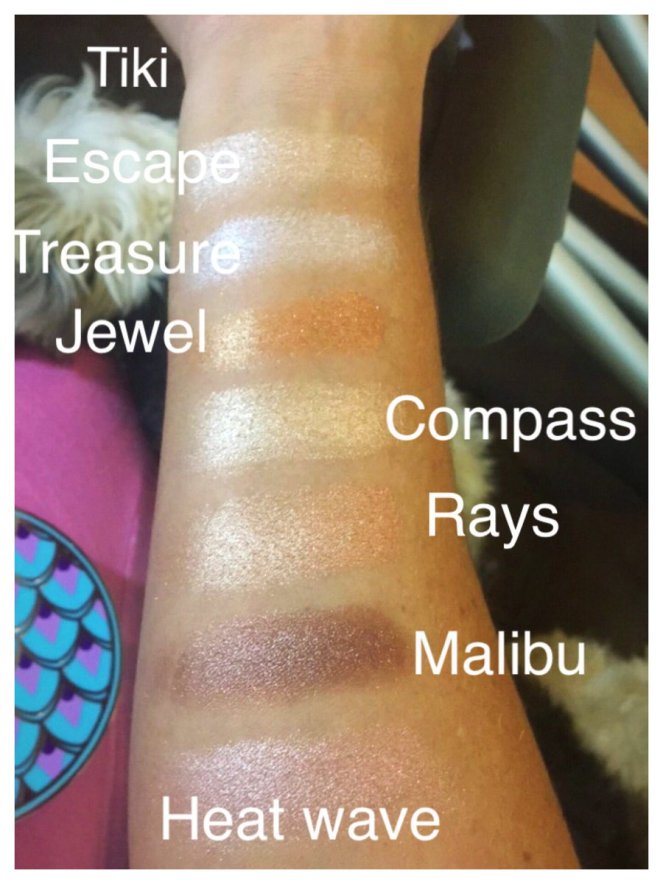
Hi everyone!! The first look I’m going to be serving you today is one using the Tarte Rainforest of the Sea Vol. III palette. This palette ya’ll… I’ll tell you what, it is so damn beautiful it’s seriously perfect for day or night. The colors are all so creamy and pigmented, you could use your finger to apply and it would be perfect. My only complaint about this palette is that the matte shade is so light it barely shows up on me. That’s it, that’s the only complaint.  Also, I don’t have a lot of pictures to go with this post, just the final product, but if you have any questions feel free to ask!!
The first thing I did was prep my face! Make sure you’re face is clean, and you’ve applied any lotions or cream you use.
Follow up with a primer! Now me, sometimes I can be lazy.. okay a lot of the time I can be lazy so I use a tinted primer. It’s from Rimmel London and it’s called #Instaflawless, I got it at Walmart but I’m sure you can find it anywhere that sells Rimmel London products. I love this primer because immediately you get a nice dewy glow, and it’s SPF 15 which is great because I never apply sunscreen (bad girl, I know). Now it doesn’t cover pimples or breakouts, but it does cover my bags under my eyes, and sometimes I’ll just wear this with some mascara for a real natural look. Also I don’t always wear foundation so this makes all my color pretty even. Just a little squirt and I just use my hands to apply it to my face. **ALSO BECAUSE IT IS TINTED MAKE SURE YOU WASH YOUR HANDS OR YOU’LL LEAVE TINY LITTLE BROWN FINGER PRINTS EVERYWHERE***

After that I do my eyes. Don’t judge my brows, I know they need done. I start with my brows using Anastasia Beverly Hills Dipbrow in Auburn, cause I’m naturally a red head, even though my hair is currently fuchsia as of Tuesday. First you outline your brow then fill it in ( I’ll do a tutorial on this later). After my brows are done I move onto my eyes, I start with Urban Decay Original Eyeshadow Primer, just a little dab on your lids and I like to use an eyeshadow brush to make sure it covers my whole lid evenly. ONTO THE EYESHADOW FUN STUFF YAYYYYY!!! I applied escape all over my lid from lash line to brow bone using a blending brush. Then, I used Malibu starting at the outer corner and blending towards the inner corner. After that apply treasure to the inner corner for a pop of color. After the eyeshadow apply your mascara of choice. Mine is Urban Decay Perversion and your eyeliner, I use Covergirl Queen vivid impact in midnight. I tight line my eyes (apply eyeliner right under your upper lashes) and I only go about half way on the bottom lashes. You’ll find that my eye routine rarely changes, the only thing i change is the shadow, but I can also do a tutorial on that at a later date.
Okay now that you’re eyes are beautiful, lets move onto the face, remember we already primed, now I contour. I use the Wet n Wild megaglo dual ended contour stick. On the parts of your face you want to pop (under eyes, bridge of nose, a little below the cheek bone but above the jawline, around your brows and on your chin, and cupids bow) use the light side. On the parts of your face you want to be smaller (hairline, on each side of the bridge of your nose, jaw line, and ill do a little bit right below my lip to make lips look plumper, and directly under your cheek bones) you use the darker side. To blend this all together i use a few drops of Hard Candy Illuminating & strobing mix in drops and a beauty blender. I apply a drop to my forehead, a drop under each eye and a little bit on my chin, just for that extra glow. Cause really can you glow enough?..I think not. After that I go back over all my contouring with the Wet n Wild mega glo Contouring palette, but this one is a powder so it doesn’t make my face look so oily. You’ll follow the same steps as the contouring stick, except this time use a brush. Then its time to blush, highlight, and bronze.
For my blush I use the e.l.f blush palette i seriously just mix all four colors together and apply to my cheek bones, but not below the apple of my cheeks, when I’m finished with that I’ll brush the leftovers on my forehead and my chin, I don’t know why I do this, I feel like it just pulls your look together. The bronzer I use is also from e.l.f and I do the same thing, I mix all 4 together, and you’ll apply that in all the places you used the darker color for your contour. Now the best part, my favorite, the highlight, I use Kylie Cosmetics in strawberry shortcake and french vanilla. I apply it in a “C” shape from above my brow down to the top of my cheek bone, the tip of my nose and my cupid bow, and just a little bit on my chin.
For my lips I used Kylie cosmetics in harmony. nothing too exciting there, haha.
And that’s it guys, that’s how I achieved this look. if you have any questions or suggestions, or maybe something you’d like to seem me do please don’t hesitate to reach out, i don’t bite 🙂 till next time, take care. xx
